本文分别从缓存、消息、检索、任务、安全、分布式、热部署和监控管理方面,对spring boot高级部分做了简单总结,内容不深但覆盖全。
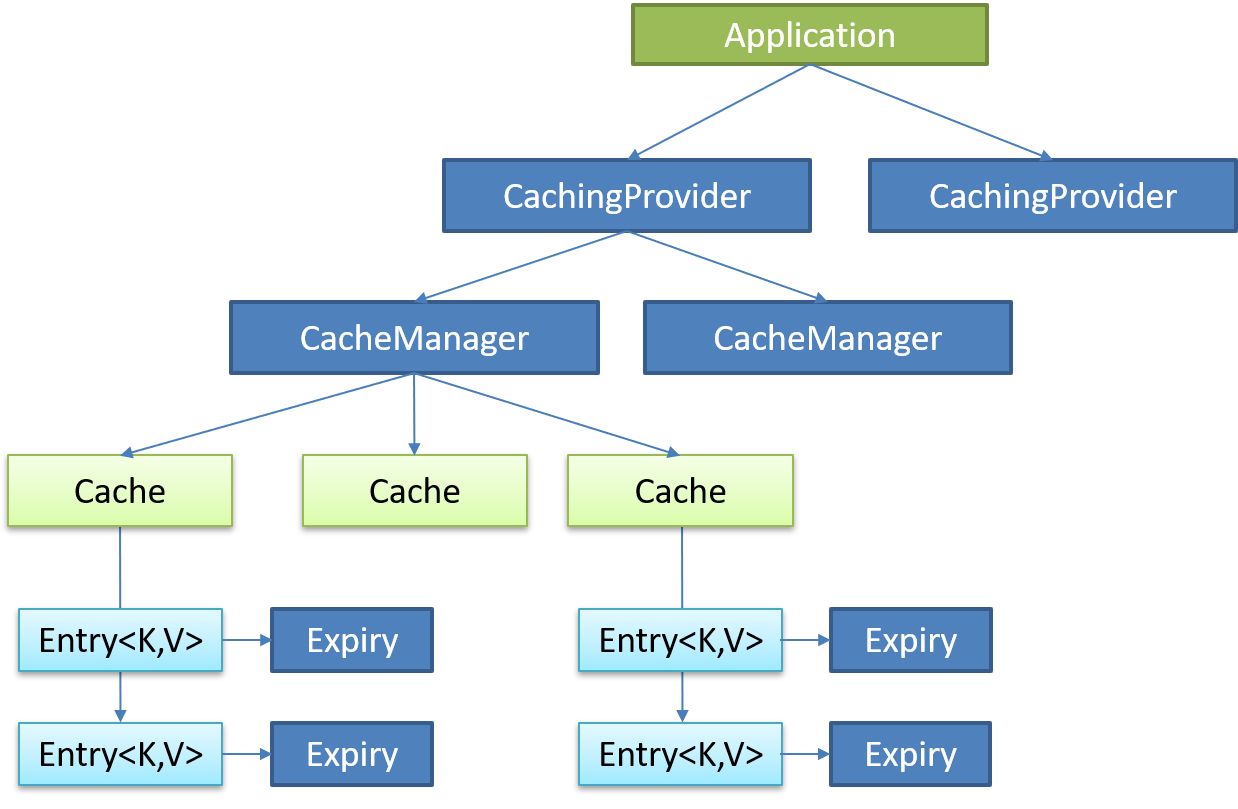
(一) Spring Boot与缓存 一、 JSR107 Java Caching定义了5个核心接口
CachingProvider
定义了创建、配置、获取、管理和控制多个CacheManager。一个应用可
CacheManager
定义了创建、配置、获取、管理和控制多个唯一命名的Cache,这些Cache
Cache
一个类似Map 的数据结构并临时存储以Key为索引 的值。一个Cache仅被一个
Entry
一个存储在Cache中的key-value对。
Expiry
每一个存储在Cache中的条目有一个定义的有效期。一旦超过这个时间,条目为过期的状态。一旦过期,条目将不可访问、更新和删除。缓存有效期可以通过ExpiryPolicy设置。
二、 Spring缓存抽象 Spring从3.1开始定义了org.springframework.cache.Cache统一 不同的缓存技术;并支持使用JCache(JSR-107) 注解简化我们开发;
Cache接口有以下功能:
Spring提供了各种xxxCache的实现;如RedisCache,EhCacheCache ,
三、 重要缓存注解及概念
Cache 缓存接口,定义缓存操作。实现有:RedisCache、EhCacheCache、ConcurrentMapCache等
CacheManager 缓存管理器,管理各种缓存(Cache)组件
@Cacheable 根据方法的请求参数对其结果进行缓存
@CacheEvict 清空缓存
@CachePut 更新缓存
@EnableCaching 开启基于注解的缓存
keyGenerator 缓存数据时key生成策略
serialize 缓存数据时value序列化策略
1 . @Cacheable/@CachePut/@CacheEvict 主要的参数
value
缓存名称,字符串/字符数组形式;
如@Cacheable(value=”mycache”) 或者@Cacheable(value={”cache1”,”cache2”}
key
缓存的key,需要按照SpEL表达式编写,如果不指定则按照方法所有参数进行组合;
如@Cacheable(value=”testcache”,key=”#userName”)
keyGenerator
key的生成器;可以自己指定key的生成器的组件id
注意:key/keyGenerator:二选一使用;
condition
缓存条件,使用SpEL编写,在调用方法之前之后都能判断;
如@Cacheable(value=”testcache”,condition=”#userName.length()>2”)
unless (@CachePut、@Cacheable)
用于否决缓存的条件,只在方法执行之后判断;
如@Cacheable(value=”testcache”,unless=”#result ==null”)
beforeInvocation (@CacheEvict)
是否在执行前清空缓存,默认为false,false情况下方法执行异常则不会清空;
如@CachEvict(value=”testcache”,beforeInvocation=true)
allEntries (@CacheEvict)
是否清空所有缓存内容,默认为false;
如@CachEvict(value=”testcache”,allEntries=true)
2 . 缓存可用的SpEL表达式 root
表示根对象,不可省略
被调用方法名 methodName
如 #root.methodName
被调用方法 method
如 #root.method.name
目标对象 target
如 #root.target
被调用的目标对象类 targetClass
如 #root.targetClass
被调用的方法的参数列表 args
如 #root.args[0]
方法调用使用的缓存列表 caches
如 #root.caches[0].name
参数名
方法参数的名字. 可以直接 #参数名 ,也可以使用 #p0或#a0 的形式,0代表参数的索引;
如 #iban 、 #a0 、 #p0
返回值
方法执行后的返回值(仅当方法执行之后的判断有效,如‘unless’ , @CachePut、@CacheEvict’的表达式beforeInvocation=false )
如 #result
四、 缓存使用 1. 基本使用步骤
引入spring-boot-starter-cache模块
1 2 3 4 <dependency > <groupId > org.springframework.boot</groupId > <artifactId > spring-boot-starter-cache</artifactId > </dependency >
@EnableCaching开启缓存
在主配置类上标注
使用缓存注解
如@Cacheable、@CachePut
切换为其他缓存
2. 搭建实验环境
导入数据库文件 创建出department和employee表
1 2 3 4 5 6 7 8 9 10 11 12 13 14 15 16 17 18 19 20 21 22 DROP TABLE IF EXISTS `department` ;CREATE TABLE `department` ( `id` int (11 ) NOT NULL AUTO_INCREMENT, `departmentName` varchar (255 ) DEFAULT NULL , PRIMARY KEY (`id` ) ) ENGINE =InnoDB DEFAULT CHARSET =utf8; DROP TABLE IF EXISTS `employee` ;CREATE TABLE `employee` ( `id` int (11 ) NOT NULL AUTO_INCREMENT, `lastName` varchar (255 ) DEFAULT NULL , `email` varchar (255 ) DEFAULT NULL , `gender` int (2 ) DEFAULT NULL , `d_id` int (11 ) DEFAULT NULL , PRIMARY KEY (`id` ) ) ENGINE =InnoDB DEFAULT CHARSET =utf8;
创建javaBean封装数据
整合MyBatis操作数据库
配置数据源信息
1
2
3
4
5
6
7
8
9
10
11
spring.datasource.username =root spring.datasource.password =123 spring.datasource.url =jdbc:mysql://localhost:3306/springboot?serverTimezone=GMT spring.datasource.driver-class-name =com.mysql.cj.jdbc.Driver mybatis.configuration.map-underscore-to-camel-case =true logging.level.cn.edu.ustc.springboot.mapper =debug debug =true
使用注解版的MyBatis;
@MapperScan指定需要扫描的mapper接口所在的包
主配置类开启@EnableCaching
3. 快速体验缓存 @Cacheable、@CachePut、@CacheEvict的使用
1
2
3
4
5
6
7
8
9
10
11
12
13
14
15
16
17
18
19
20
21
22
23
24
25
26
27
28
29
30
@Service public class EmployeeService @Autowired private EmployeeMapper employeeMapper; @Cacheable (value={"emp" }, key = "#id+#root.methodName+#root.caches[0].name" , condition = "#a0>1" , unless = "#p0==2" ) public Employee getEmpById (Integer id) System.out.println("查询员工:" +id); return employeeMapper.getEmpById(id); } @CachePut (value = {"emp" },key = "#employee.id" ) public Employee updateEmp (Employee employee) System.out.println("更新员工" +employee); employeeMapper.updateEmp(employee); return employee; } @CacheEvict (value = {"emp" },allEntries = true ,beforeInvocation = true ) public Integer delEmp (Integer id) int i=1 /0 ; System.out.println("删除员工:" +id); employeeMapper.delEmp(id); return id; } }
自定义KeyGenerator
使用时在注解属性内指定KeyGenerator=“myKeyGenerator”
1
2
3
4
5
6
7
8
9
10
11
12
@Configuration public class MyCacheConfig @Bean ("myKeyGenerator" ) public KeyGenerator myKeyGenerator () return new KeyGenerator(){ @Override public Object generate (Object target, Method method, Object... params) return method.getName()+"[" + Arrays.asList(params).toString()+target+"]" ; } }; } }
@CacheConfig
标注在类上,用于抽取@Cacheable的公共属性
由于一个类中可能会使用多次@Cacheable等注解,所以各项属性可以抽取到@CacheConfig
@Caching
组合使用@Cacheable、@CachePut、@CacheEvict
1
2
3
4
5
6
7
8
9
10
11
12
@Caching ( cacheable = { @Cacheable (key = "#lastName" ) }, put = { @CachePut (key = "#result.id" ), @CachePut (key = "#result.email" ) } ) public Employee getEmpByLastName (String lastName) return employeeMapper.getEmpByLastName(lastName); }
4. 工作原理 缓存的自动配置类CacheAutoConfiguration向容器中导入了CacheConfigurationImportSelector,此类的selectImports()方法添加了许多配置类,其中SimpleCacheConfiguration默认生效
GenericCacheConfiguration
1
2
3
4
5
6
7
8
9
10
11
12
13
14
15
16
17
@Import ({ CacheConfigurationImportSelector.class , CacheManagerEntityManagerFactoryDependsOnPostProcessor .class }) public class CacheAutoConfiguration static class CacheConfigurationImportSelector implements ImportSelector @Override public String[] selectImports(AnnotationMetadata importingClassMetadata) { CacheType[] types = CacheType.values(); String[] imports = new String[types.length]; for (int i = 0 ; i < types.length; i++) { imports[i] = CacheConfigurations.getConfigurationClass(types[i]); } return imports; } } }
SimpleCacheConfiguration向容器中导入了ConcurrentMapCacheManager
1
2
3
4
5
6
7
8
9
10
11
12
13
14
15
16
@Configuration (proxyBeanMethods = false )@ConditionalOnMissingBean (CacheManager.class ) @Conditional (CacheCondition .class ) class SimpleCacheConfiguration @Bean ConcurrentMapCacheManager cacheManager (CacheProperties cacheProperties, CacheManagerCustomizers cacheManagerCustomizers) ConcurrentMapCacheManager cacheManager = new ConcurrentMapCacheManager(); List<String> cacheNames = cacheProperties.getCacheNames(); if (!cacheNames.isEmpty()) { cacheManager.setCacheNames(cacheNames); } return cacheManagerCustomizers.customize(cacheManager); } }
ConcurrentMapCacheManager使用ConcurrentMap以k-v的方式存储缓存缓存,下面以@Cacheable的运行流程为例说明ConcurrentMapCacheManager的作用。
==@Cacheable的运行流程==
方法运行之前,先去查询Cache(缓存组件),按照cacheNames指定的名字获取 ;
去Cache中查找缓存的内容,使用一个key,默认就是方法的参数;key是按照某种策略生成的 ;默认是使用keyGenerator生成的,默认使用SimpleKeyGenerator生成key;
SimpleKeyGenerator生成key的默认策略;
如果没有参数;key=new SimpleKey();
没有查到缓存就调用目标方法;
将目标方法返回的结果,放进缓存中
@Cacheable标注的方法执行之前先来检查缓存中有没有这个数据,默认按照参数的值作为key去查询缓存,
核心:
源码分析
默认使用ConcurrentMapCacheManager管理缓存,该类使用ConcurrentMap保存缓存,获取缓存如果没有Cache组件会自动创建,并以cacheNames-cache对放入ConcurrentMap。
1
2
3
4
5
6
7
8
9
10
11
12
13
14
15
16
17
18
19
20
21
22
public class ConcurrentMapCacheManager implements CacheManager , BeanClassLoaderAware private final ConcurrentMap<String, Cache> cacheMap = new ConcurrentHashMap<>(); private boolean dynamic = true ; public Cache getCache (String name) Cache cache = this .cacheMap.get(name); if (cache == null && this .dynamic) { synchronized (this .cacheMap) { cache = this .cacheMap.get(name); if (cache == null ) { cache = createConcurrentMapCache(name); this .cacheMap.put(name, cache); } } } return cache; } }
在@Cacheable标注方法执行前执行CacheAspectSupport的execute()方法,在该方法中会以一定的规则生成key,并尝试在缓存中通过该key获取值,若通过key获取到值则直接返回,不用执行@Cacheable标注方法,否则执行该方法获得返回值。
1
2
3
4
5
6
7
8
9
10
11
12
13
14
15
16
17
18
19
20
21
22
23
24
25
26
27
28
29
30
31
32
33
34
35
36
37
38
39
40
41
42
43
44
45
46
47
48
49
50
51
52
53
54
55
56
57
58
59
60
61
62
63
64
65
66
67
68
69
70
71
72
73
74
75
76
77
78
79
80
81
82
83
84
85
86
87
88
89
90
91
92
93
94
95
96
public abstract class CacheAspectSupport extends AbstractCacheInvoker implements BeanFactoryAware , InitializingBean , SmartInitializingSingleton { @Nullable private Object execute (final CacheOperationInvoker invoker, Method method, CacheOperationContexts contexts) if (contexts.isSynchronized()) { CacheOperationContext context = contexts.get(CacheableOperation.class ).iterator ().next () ; if (isConditionPassing(context, CacheOperationExpressionEvaluator.NO_RESULT)) { Object key = generateKey(context, CacheOperationExpressionEvaluator.NO_RESULT); Cache cache = context.getCaches().iterator().next(); try { return wrapCacheValue(method, cache.get(key, () -> unwrapReturnValue(invokeOperation(invoker)))); } catch (Cache.ValueRetrievalException ex) { throw (CacheOperationInvoker.ThrowableWrapper) ex.getCause(); } } else { return invokeOperation(invoker); } } processCacheEvicts(contexts.get(CacheEvictOperation.class ), true , CacheOperationExpressionEvaluator .NO_RESULT ) ; Cache.ValueWrapper cacheHit = findCachedItem(contexts.get(CacheableOperation.class )) ; List<CachePutRequest> cachePutRequests = new LinkedList<>(); if (cacheHit == null ) { collectPutRequests(contexts.get(CacheableOperation.class ), CacheOperationExpressionEvaluator .NO_RESULT , cachePutRequests ) ; } Object cacheValue; Object returnValue; if (cacheHit != null && !hasCachePut(contexts)) { cacheValue = cacheHit.get(); returnValue = wrapCacheValue(method, cacheValue); } else { returnValue = invokeOperation(invoker); cacheValue = unwrapReturnValue(returnValue); } collectPutRequests(contexts.get(CachePutOperation.class ), cacheValue , cachePutRequests ) ; for (CachePutRequest cachePutRequest : cachePutRequests) { cachePutRequest.apply(cacheValue); } processCacheEvicts(contexts.get(CacheEvictOperation.class ), false , cacheValue ) ; return returnValue; } @Nullable private Cache.ValueWrapper findCachedItem (Collection<CacheOperationContext> contexts) { Object result = CacheOperationExpressionEvaluator.NO_RESULT; for (CacheOperationContext context : contexts) { if (isConditionPassing(context, result)) { Object key = generateKey(context, result); Cache.ValueWrapper cached = findInCaches(context, key); if (cached != null ) { return cached; } else { if (logger.isTraceEnabled()) { logger.trace("No cache entry for key '" + key + "' in cache(s) " + context.getCacheNames()); } } } } return null ; } @Nullable protected Object generateKey (@Nullable Object result) if (StringUtils.hasText(this .metadata.operation.getKey())) { EvaluationContext evaluationContext = createEvaluationContext(result); return evaluator.key(this .metadata.operation.getKey(), this .metadata.methodKey, evaluationContext); } return this .metadata.keyGenerator.generate(this .target, this .metadata.method, this .args); }
默认情况下使用SimpleKeyGenerator生成key
1
2
3
4
5
6
7
8
9
10
11
12
13
14
15
16
17
18
public class SimpleKeyGenerator implements KeyGenerator public static Object generateKey (Object... params) if (params.length == 0 ) { return SimpleKey.EMPTY; } if (params.length == 1 ) { Object param = params[0 ]; if (param != null && !param.getClass().isArray()) { return param; } } return new SimpleKey(params); } }
默认的缓存类ConcurrentMapCache,使用ConcurrentMap存储k-v
1
2
3
4
5
6
7
8
9
10
11
12
13
14
15
16
17
public class ConcurrentMapCache extends AbstractValueAdaptingCache private final String name; private final ConcurrentMap<Object, Object> store; protected Object lookup (Object key) return this .store.get(key); } public void put (Object key, @Nullable Object value) this .store.put(key, toStoreValue(value)); } }
五、Redis与缓存 1. 环境搭建 导入依赖
1 2 3 4 <dependency > <groupId > org.springframework.boot</groupId > <artifactId > spring-boot-starter-data-redis</artifactId > </dependency >
在spring.properties指定Redis服务器地址
1 2 spring.redis.host =192.168.31.162
2. RedisTemplate RedisAutoConfiguration向容器中导入了两个类RedisTemplate<Object, Object> redisTemplate和StringRedisTemplate,作为Redis客户端分别操作k-v都为对象和k-v都为字符串的值
Redis常见的五大数据类型
String(字符串)、List(列表)、Set(集合)、Hash(散列)、ZSet(有序集合)
stringRedisTemplate.opsForValue()[String(字符串)]
stringRedisTemplate.opsForList()[List(列表)]
stringRedisTemplate.opsForSet()[Set(集合)]
stringRedisTemplate.opsForHash()[Hash(散列)]
stringRedisTemplate.opsForZSet()[ZSet(有序集合)]
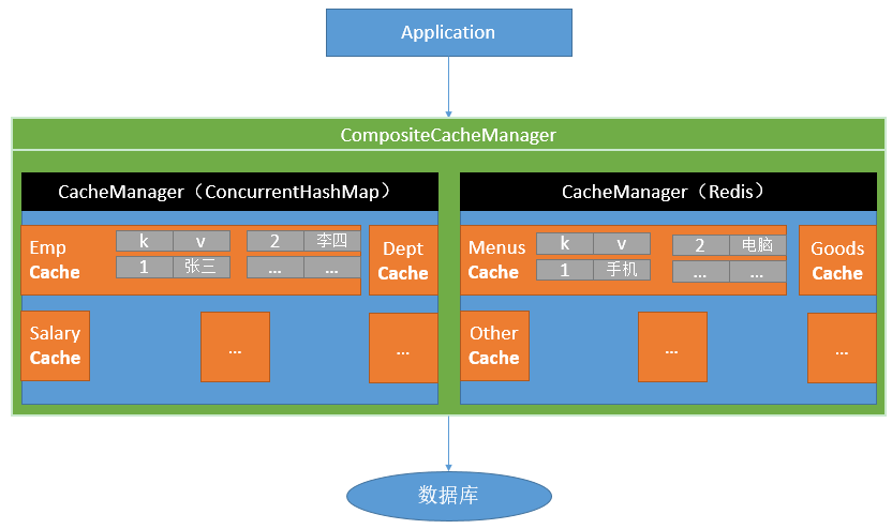
3. Redis缓存使用 在导入redis依赖后RedisCacheConfiguration类就会自动生效,创建RedisCacheManager,并使用RedisCache进行缓存数据,要缓存的对象的类要实现Serializable接口,默认情况下是以jdk序列化数据 存在redis中,如下:
1
2
3
k:"emp::1" v: \xAC\xED\x00\x05sr\x00$cn.edu.ustc.springboot.bean.Employeeuqf\x03p\x9A\xCF\xE0\x02\x00\x05L\x00\x03dIdt\x00\x13Ljava/lang/Integer;L\x00\x05emailt\x00\x12Ljava/lang/String;L\x00\x06genderq\x00~\x00\x01L\x00\x02idq\x00~\x00\x01L\x00\x08lastNameq\x00~\x00\x02xpsr\x00\x11java.lang.Integer\x12\xE2\xA0\xA4\xF7\x81\x878\x02\x00\x01I\x00\x05valuexr\x00\x10java.lang.Number\x86\xAC\x95\x1D\x0B\x94\xE0\x8B\x02\x00\x00xp\x00\x00\x00\x03t\x00\x07cch@aaasq\x00~\x00\x04\x00\x00\x00\x01q\x00~\x00\x08t\x00\x03cch
要想让对象以json形式 存储在redis中,需要自定义RedisCacheManager,使用GenericJackson2JsonRedisSerializer类对value进行序列化
1
2
3
4
5
6
7
8
9
10
11
12
13
14
15
16
17
18
19
20
@Configuration public class MyRedisConfig @Bean RedisCacheManager cacheManager (RedisConnectionFactory factory) { RedisCacheWriter cacheWriter = RedisCacheWriter.nonLockingRedisCacheWriter(factory); GenericJackson2JsonRedisSerializer jsonRedisSerializer = new GenericJackson2JsonRedisSerializer(); RedisSerializationContext.SerializationPair<Object> serializationPair = RedisSerializationContext.SerializationPair.fromSerializer(jsonRedisSerializer); RedisCacheConfiguration cacheConfiguration=RedisCacheConfiguration.defaultCacheConfig().serializeValuesWith(serializationPair); RedisCacheManager cacheManager = new RedisCacheManager(cacheWriter,cacheConfiguration); return cacheManager; } }
序列化数据如下:
1
2
3
4
5
6
7
8
9
10
11
k:"emp::3" v: { "@class" : "cn.edu.ustc.springboot.bean.Employee" , "id" : 3 , "lastName" : "aaa" , "email" : "aaaa" , "gender" : 1 , "dId" : 5 }
注意 ,这里必须用GenericJackson2JsonRedisSerializer 进行value的序列化解析,如果使用Jackson2JsonRedisSerializer,序列化的json没有"@class": "cn.edu.ustc.springboot.bean.Employee",在读取缓存时会报类型转换异常。
4. Redis缓存原理 配置类RedisCacheConfiguration向容器中导入了其定制的RedisCacheManager,在默认的RedisCacheManager的配置中,是使用jdk序列化value值
1
2
3
4
5
6
7
8
9
10
11
12
13
14
15
16
17
18
19
20
21
22
23
24
25
26
27
28
29
30
31
32
33
34
35
36
37
38
39
40
41
42
43
44
45
46
47
48
49
50
51
52
53
54
55
56
57
58
59
60
61
62
63
@Configuration (proxyBeanMethods = false )@ConditionalOnClass (RedisConnectionFactory.class ) @AutoConfigureAfter (RedisAutoConfiguration .class ) @ConditionalOnBean (RedisConnectionFactory .class ) @ConditionalOnMissingBean (CacheManager .class ) @Conditional (CacheCondition .class ) class RedisCacheConfiguration @Bean RedisCacheManager cacheManager (CacheProperties cacheProperties, CacheManagerCustomizers cacheManagerCustomizers, ObjectProvider<org.springframework.data.redis.cache.RedisCacheConfiguration> redisCacheConfiguration, ObjectProvider<RedisCacheManagerBuilderCustomizer> redisCacheManagerBuilderCustomizers, RedisConnectionFactory redisConnectionFactory, ResourceLoader resourceLoader) RedisCacheManagerBuilder builder = RedisCacheManager.builder(redisConnectionFactory).cacheDefaults( determineConfiguration(cacheProperties, redisCacheConfiguration, resourceLoader.getClassLoader())); List<String> cacheNames = cacheProperties.getCacheNames(); if (!cacheNames.isEmpty()) { builder.initialCacheNames(new LinkedHashSet<>(cacheNames)); } redisCacheManagerBuilderCustomizers.orderedStream().forEach((customizer) -> customizer.customize(builder)); return cacheManagerCustomizers.customize(builder.build()); } private org.springframework.data.redis.cache.RedisCacheConfiguration determineConfiguration ( CacheProperties cacheProperties, ObjectProvider<org.springframework.data.redis.cache.RedisCacheConfiguration> redisCacheConfiguration, ClassLoader classLoader) return redisCacheConfiguration.getIfAvailable(() -> createConfiguration(cacheProperties, classLoader)); } private org.springframework.data.redis.cache.RedisCacheConfiguration createConfiguration ( CacheProperties cacheProperties, ClassLoader classLoader) Redis redisProperties = cacheProperties.getRedis(); org.springframework.data.redis.cache.RedisCacheConfiguration config = org.springframework.data.redis.cache.RedisCacheConfiguration .defaultCacheConfig(); config = config.serializeValuesWith( SerializationPair.fromSerializer(new JdkSerializationRedisSerializer(classLoader))); if (redisProperties.getTimeToLive() != null ) { config = config.entryTtl(redisProperties.getTimeToLive()); } if (redisProperties.getKeyPrefix() != null ) { config = config.prefixKeysWith(redisProperties.getKeyPrefix()); } if (!redisProperties.isCacheNullValues()) { config = config.disableCachingNullValues(); } if (!redisProperties.isUseKeyPrefix()) { config = config.disableKeyPrefix(); } return config; } }
RedisCacheManager的直接构造类,该类保存了配置类RedisCacheConfiguration,该配置在会传递给RedisCacheManager
1
2
3
4
5
6
7
8
9
10
11
12
13
14
15
16
17
18
19
20
21
22
23
24
25
26
27
28
29
30
31
32
33
34
35
36
public static class RedisCacheManagerBuilder private final RedisCacheWriter cacheWriter; private RedisCacheConfiguration defaultCacheConfiguration = RedisCacheConfiguration.defaultCacheConfig(); private final Map<String, RedisCacheConfiguration> initialCaches = new LinkedHashMap<>(); private boolean enableTransactions; boolean allowInFlightCacheCreation = true ; private RedisCacheManagerBuilder (RedisCacheWriter cacheWriter) this .cacheWriter = cacheWriter; } public RedisCacheManagerBuilder cacheDefaults (RedisCacheConfiguration defaultCacheConfiguration) Assert.notNull(defaultCacheConfiguration, "DefaultCacheConfiguration must not be null!" ); this .defaultCacheConfiguration = defaultCacheConfiguration; return this ; } public RedisCacheManager build () RedisCacheManager cm = new RedisCacheManager(cacheWriter, defaultCacheConfiguration, initialCaches, allowInFlightCacheCreation); cm.setTransactionAware(enableTransactions); return cm; }
RedisCacheConfiguration保存了许多缓存规则,这些规则都保存在RedisCacheManagerBuilder的RedisCacheConfiguration defaultCacheConfiguration属性中,并且当RedisCacheManagerBuilder创建RedisCacheManager传递过去
1
2
3
4
5
6
7
8
9
10
11
12
13
14
15
16
17
18
19
20
21
22
23
24
public class RedisCacheConfiguration private final Duration ttl; private final boolean cacheNullValues; private final CacheKeyPrefix keyPrefix; private final boolean usePrefix; private final SerializationPair<String> keySerializationPair; private final SerializationPair<Object> valueSerializationPair; private final ConversionService conversionService; public static RedisCacheConfiguration defaultCacheConfig (@Nullable ClassLoader classLoader) DefaultFormattingConversionService conversionService = new DefaultFormattingConversionService(); registerDefaultConverters(conversionService); return new RedisCacheConfiguration(Duration.ZERO, true , true , CacheKeyPrefix.simple(), SerializationPair.fromSerializer(RedisSerializer.string()), SerializationPair.fromSerializer(RedisSerializer.java(classLoader)), conversionService); }
RedisCacheManager在创建RedisCache时将RedisCacheConfiguration传递过去,并在创建RedisCache时通过createRedisCache()起作用
1
2
3
4
5
6
7
8
9
10
11
public class RedisCacheManager extends AbstractTransactionSupportingCacheManager private final RedisCacheWriter cacheWriter; private final RedisCacheConfiguration defaultCacheConfig; private final Map<String, RedisCacheConfiguration> initialCacheConfiguration; private final boolean allowInFlightCacheCreation; protected RedisCache createRedisCache (String name, @Nullable RedisCacheConfiguration cacheConfig) return new RedisCache(name, cacheWriter, cacheConfig != null ? cacheConfig : defaultCacheConfig); }
RedisCache,Redis缓存,具体负责将缓存数据序列化的地方,将RedisCacheConfiguration的序列化对SerializationPair提取出来并使用其定义的序列化方式分别对k和v进行序列化操作
1
2
3
4
5
6
7
8
9
10
11
12
13
14
15
16
17
18
19
20
21
22
23
24
25
26
27
28
29
30
31
32
33
34
35
36
37
38
39
public class RedisCache extends AbstractValueAdaptingCache private static final byte [] BINARY_NULL_VALUE = RedisSerializer.java().serialize(NullValue.INSTANCE); private final String name; private final RedisCacheWriter cacheWriter; private final RedisCacheConfiguration cacheConfig; private final ConversionService conversionService; public void put (Object key, @Nullable Object value) Object cacheValue = preProcessCacheValue(value); if (!isAllowNullValues() && cacheValue == null ) { throw new IllegalArgumentException(String.format( "Cache '%s' does not allow 'null' values. Avoid storing null via '@Cacheable(unless=\"#result == null\")' or configure RedisCache to allow 'null' via RedisCacheConfiguration." , name)); } cacheWriter.put(name, createAndConvertCacheKey(key), serializeCacheValue(cacheValue), cacheConfig.getTtl()); } protected byte [] serializeCacheKey(String cacheKey) { return ByteUtils.getBytes(cacheConfig.getKeySerializationPair().write(cacheKey)); } protected byte [] serializeCacheValue(Object value) { if (isAllowNullValues() && value instanceof NullValue) { return BINARY_NULL_VALUE; } return ByteUtils.getBytes(cacheConfig.getValueSerializationPair().write(value)); }
分析到这也就不难理解,要使用json保存序列化数据时,需要自定义RedisCacheManager,在RedisCacheConfiguration中定义序列化转化规则,并向RedisCacheManager传入我们自己定制的RedisCacheConfiguration了,我定制的序列化规则会跟随RedisCacheConfiguration一直传递到RedisCache,并在序列化时发挥作用。
(二) Spring Boot与消息 一、消息简介 消息代理规范
JMS(Java Message Service)JAVA消息服务
基于JVM消息代理的规范。ActiveMQ、HornetMQ是JMS实现
AMQP(Advanced Message Queuing Protocol)
高级消息队列协议,也是一个消息代理的规范,兼容JMS
RabbitMQ是AMQP的实现
作用
通过消息服务中间件来提升系统异步通信、扩展解耦能力
当消息发送者发送消息以后,将由消息代理接管,消息代理保证消息传递到指定目的地
应用场景
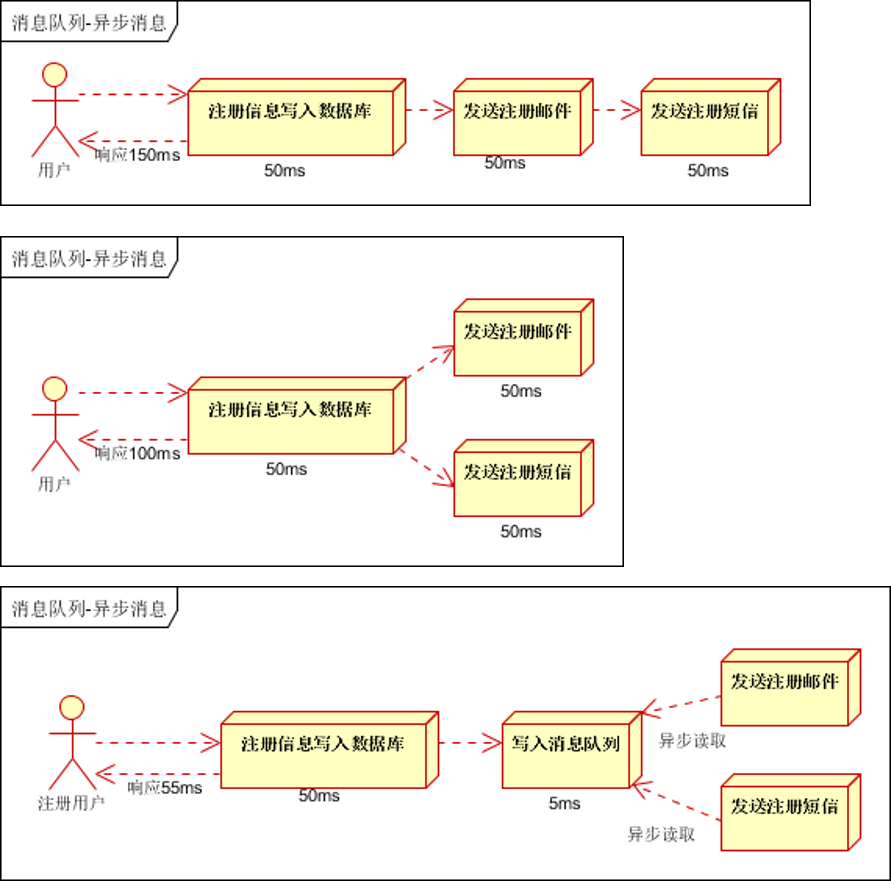
异步处理
用户注册操作和消息处理并行,提高响应速度
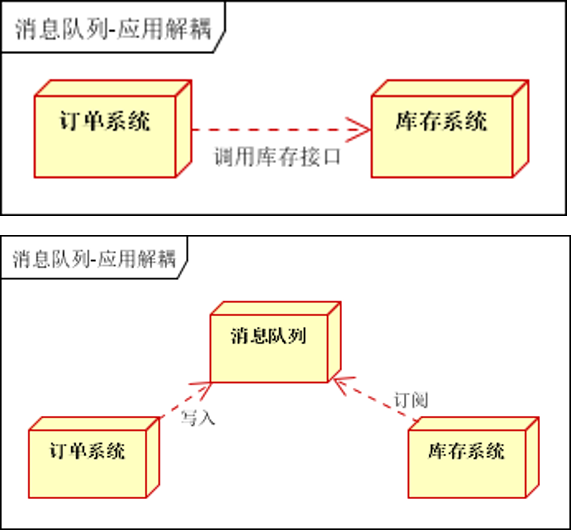
应用解耦
在下单时库存系统不能正常使用。也不影响正常下单,因为下单后,订单系统写入消息队列就不再关心其他的后续操作了。实现订单系统与库存系统的应用解耦
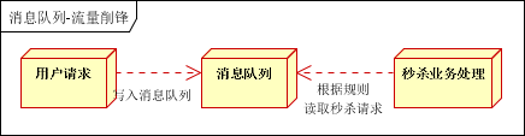
流量削峰
用户的请求,服务器接收后,首先写入消息队列。假如消息队列长度超过最大数量,则直接抛弃用户请求或跳转到错误页面
秒杀业务根据消息队列中的请求信息,再做后续处理
二、RabbitMQ RabbitMQ是一个由erlang开发的AMQP(Advanved Message Queue Protocol)的开源实现。
1. 核心概念
Message
消息,消息是不具名的,它由消息头和消息体组成
消息头,包括routing-key(路由键)、priority(相对于其他消息的优先权)、delivery-mode(指出该消息可能需要持久性存储)等
Publisher
消息的生产者,也是一个向交换器发布消息的客户端应用程序
Exchange
交换器,将生产者消息路由给服务器中的队列
类型有direct(默认),fanout, topic, 和headers,具有不同转发策略
Queue
Binding
Connection
Consumer
消息的消费者,表示一个从消息队列中取得消息的客户端应用程序
Virtual Host
虚拟主机,表示一批交换器、消息队列和相关对象。
vhost 是 AMQP 概念的基础,必须在连接时指定
RabbitMQ 默认的 vhost 是 /
Broker
2. 运行机制 消息路由
AMQP 中增加了Exchange 和 Binding 的角色, Binding 决定交换器的消息应该发送到那个队列
Exchange 类型
direct
点对点模式,消息中的路由键(routing key)如果和 Binding 中的 binding
fanout
广播模式,每个发到 fanout 类型交换器的消息都会分到所有绑定的队列上去
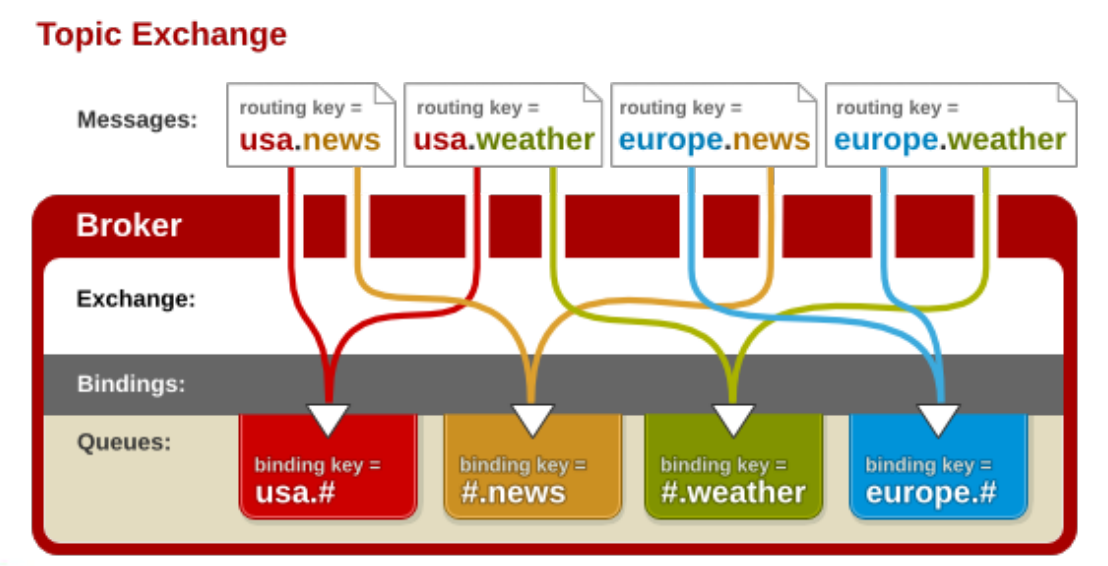
topic
将路由键和某个模式进行匹配,此时队列需要绑定到一个模式上。它将路由键和绑定键的字符串切分成单词,这些单词之间用点隔开。
三、 Springboot中的RabbitMQ 1. 环境准备 在docker中安装rabbitmq并运行
1
2
# 5672为服务端口,15672为web控制台端口 docker run -d -p 5672:5672 -p 15672:15672 38e57f281891
导入依赖
1 2 3 4 5 6 7 8 9 <dependency > <groupId > org.springframework.boot</groupId > <artifactId > spring-boot-starter-amqp</artifactId > </dependency > <dependency > <groupId > com.fasterxml.jackson.core</groupId > <artifactId > jackson-databind</artifactId > </dependency >
配置文件
1 2 3 4 spring.rabbitmq.host =192.168.31.162
2. RabbitMQ的使用 RabbitAutoConfiguration中有内部类RabbitTemplateConfiguration,在该类中向容器中分别导入了RabbitTemplate 和AmqpAdmin
在测试类中分别注入
1
2
3
4
5
@Autowired private RabbitTemplate rabbitTemplate; @Autowired private AmqpAdmin amqpAdmin;
RabbitTemplate消息发送处理组件
可用来发送和接收消息
1 2 3 4 5 6 7 8 9 10 11 12 rabbitTemplate.convertAndSend("amq.direct" ,"ustc" ,"aaaa" ); Book book = new Book(); book.setName("西游记" ); book.setPrice(23.2f ); rabbitTemplate.convertAndSend("amq.direct" ,"ustc" ,book); Object o = rabbitTemplate.receiveAndConvert("ustc" ); System.out.println(o.getClass()); System.out.println(o);
默认的消息转化器是SimpleMessageConverter,对于对象以jdk序列化方式存储,若要以Json方式存储对象,就要自定义消息转换器
1
2
3
4
5
6
7
8
@Configuration public class AmqpConfig @Bean public MessageConverter messageConverter () return new Jackson2JsonMessageConverter(); } }
1 2 3 4 5 6 amqpAdmin.declareExchange(new DirectExchange("admin.direct" )); amqpAdmin.declareQueue(new Queue("admin.test" )); amqpAdmin.declareBinding(new Binding("admin.test" , Binding.DestinationType.QUEUE,"admin.direct" ,"admin.test" ,null ));
消息的监听
在回调方法上标注@RabbitListener注解,并设置其属性queues,注册监听队列,当该队列收到消息时,标注方法遍会调用
可分别使用Message和保存消息所属对象进行消息接收,若使用Object对象进行消息接收,实际上接收到的也是Message
1
2
3
4
5
6
7
8
9
10
11
12
13
14
15
16
17
18
@Service public class BookService @RabbitListener (queues = {"admin.test" }) public void receive1 (Book book) System.out.println("收到消息:" +book); } @RabbitListener (queues = {"admin.test" }) public void receive1 (Object object) System.out.println("收到消息:" +object.getClass()); } @RabbitListener (queues = {"admin.test" }) public void receive2 (Message message) System.out.println("收到消息" +message.getHeaders()+"---" +message.getPayload()); } }
(三) Spring boot与检索 一、 ElasticSearch入门 1. ES的简介 简介
我们的应用经常需要添加检索功能,开源的 ElasticSearch 是目前全文搜索引擎的首选。他可以快速的存储、搜索和分析海量数据。Spring Boot通过整合Spring Data ElasticSearch为我们提供了非常便捷的检索功能支持;
概念
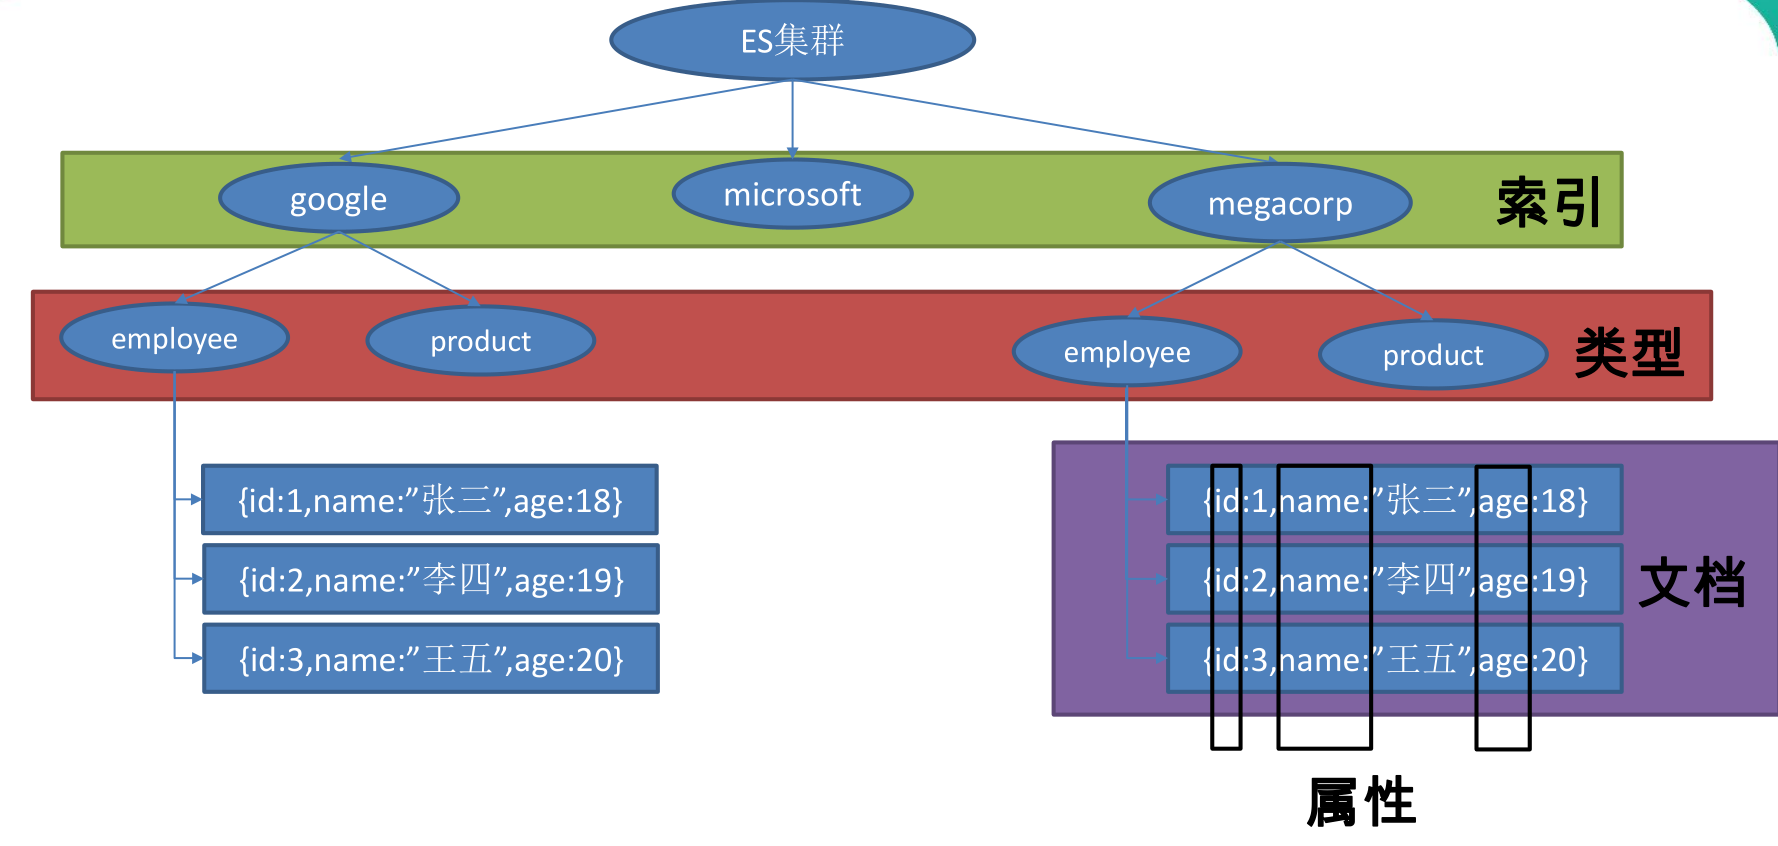
员工文档 的形式存储为例:一个文档 代表一个员工数据 。存储数据到ElasticSearch 的行为叫做 索引 ,但在索引一个文档之前,需要确定将文档存储在哪里。
一个 ElasticSearch 集群可以包含多个 索引 ,相应的每个索引可以包含多个 类型 。 这些不同的类型存储着多个 文档 ,每个文档又有 多个 属性 。
1
2
3
4
5
6
7
索引(名词): 如前所述,一个 *索引* 类似于传统关系数据库中的一个 *数据库* ,是一个存储关系型文档的地方。 *索引* (*index*) 的复数词为 *indices* 或 *indexes* 。 索引(动词): *索引一个文档* 就是存储一个文档到一个 *索引* (名词)中以便被检索和查询。这非常类似于 SQL 语句中的 `INSERT` 关键词,除了文档已存在时,新文档会替换旧文档情况之外。
类似关系:
1
2
3
4
- 索引---数据库 - 类型---表 - 文档---表中的记录 - 属性---列
2. ES的安装与运行 与ES交互
9200端口
RESTful API通过HTTP通信
9300端口
Java客户端与ES的原生传输协议和集群交互
1
2
3
4
# 拉取ES镜像 docker pull elasticsearch:7.6.1 # 运行ES docker run -e "discovery.type=single-node" -e ES_JAVA_OPTS="-Xms256m -Xmx256m" -d -p 9200:9200 -p 9300:9300 --name ES03 41072cdeebc5
ES_JAVA_OPTS指定java虚拟机相关参数
-Xms256m 初始堆内存大小为256m
-Xmx256m 最大堆内存大小为256m
discovery.type=single-node 设置为单点启动
3. ES的基础入门 案例:创建一个员工目录,并支持各类型检索
索引员工文档
对于员工目录,我们将做如下操作:
每个员工索引一个文档,文档包含该员工的所有信息。
每个文档都将是 employee 类型 。
该类型位于 索引 megacorp 内。
1
2
3
4
5
6
7
8
PUT /megacorp/employee/1 { "first_name" : "John", "last_name" : "Smith", "age" : 25, "about" : "I love to go rock climbing", "interests": [ "sports", "music" ] }
注意,路径 /megacorp/employee/1 包含了三部分的信息:
megacorp
索引名称
employee
类型名称
1
特定雇员的ID
请求体 —— JSON 文档 —— 包含了这位员工的所有详细信息
1
2
3
4
5
6
7
8
9
10
11
12
13
14
{ "_index" : "megacorp" , "_type" : "employee" , "_id" : "1" , "_version" : 1 , "result" : "created" , "_shards" : { "total" : 2 , "successful" : 1 , "failed" : 0 }, "_seq_no" : 0 , "_primary_term" : 1 }
同理,添加更多员工
1
2
3
4
5
6
7
8
9
10
11
12
13
14
15
16
17
PUT /megacorp/employee/2 { "first_name" : "Jane", "last_name" : "Smith", "age" : 32, "about" : "I like to collect rock albums", "interests": [ "music" ] } PUT /megacorp/employee/3 { "first_name" : "Douglas", "last_name" : "Fir", "age" : 35, "about": "I like to build cabinets", "interests": [ "forestry" ] }
检索文档
HTTP GET 请求并指定文档的地址——索引库、类型和ID。
1 GET /megacorp/employee/1
返回数据
1
2
3
4
5
6
7
8
9
10
11
12
13
14
15
16
17
18
19
{ "_index" : "megacorp" , "_type" : "employee" , "_id" : "1" , "_version" : 1 , "_seq_no" : 0 , "_primary_term" : 1 , "found" : true , "_source" : { "first_name" : "John" , "last_name" : "Smith" , "age" : 25 , "about" : "I love to go rock climbing" , "interests" : [ "sports" , "music" ] } }
将 HTTP 命令由 PUT 改为 GET 可以用来检索文档,同样的,可以使用 DELETE 命令来删除文档,以及使用 HEAD 指令来检查文档是否存在。如果想更新已存在的文档,只需再次 PUT 。
轻量搜索
搜索所有雇员:
1 GET /megacorp/employee/_search
返回数据
1
2
3
4
5
6
7
8
9
10
11
12
13
14
15
16
17
18
19
20
21
22
23
24
25
26
27
28
29
30
31
32
33
34
35
36
37
38
39
40
41
42
43
44
45
46
47
48
49
50
51
52
53
54
55
56
57
58
59
60
61
62
63
64
65
{ "took" : 46 , "timed_out" : false , "_shards" : { "total" : 1 , "successful" : 1 , "skipped" : 0 , "failed" : 0 }, "hits" : { "total" : { "value" : 3 , "relation" : "eq" }, "max_score" : 1 , "hits" : [ { "_index" : "megacorp" , "_type" : "employee" , "_id" : "1" , "_score" : 1 , "_source" : { "first_name" : "John" , "last_name" : "Smith" , "age" : 25 , "about" : "I love to go rock climbing" , "interests" : [ "sports" , "music" ] } }, { "_index" : "megacorp" , "_type" : "employee" , "_id" : "2" , "_score" : 1 , "_source" : { "first_name" : "Jane" , "last_name" : "Smith" , "age" : 32 , "about" : "I like to collect rock albums" , "interests" : [ "music" ] } }, { "_index" : "megacorp" , "_type" : "employee" , "_id" : "3" , "_score" : 1 , "_source" : { "first_name" : "Douglas" , "last_name" : "Fir" , "age" : 35 , "about" : "I like to build cabinets" , "interests" : [ "forestry" ] } } ] } }
返回结果包括三个文档,放在数据hits中。
搜索姓氏为 Smith 的雇员
1 GET /megacorp/employee/_search?q=last_name:Smith
在请求路径中使用 _search 端点,并将查询本身赋值给参数 q= 。返回结果给出了所有的 Smith:
1
2
3
4
5
6
7
8
9
10
11
12
13
14
15
16
17
18
19
20
21
22
23
24
25
26
27
28
29
30
31
32
33
34
35
36
37
38
39
40
41
42
43
44
45
46
47
48
49
50
{ "took" : 23 , "timed_out" : false , "_shards" : { "total" : 1 , "successful" : 1 , "skipped" : 0 , "failed" : 0 }, "hits" : { "total" : { "value" : 2 , "relation" : "eq" }, "max_score" : 0.4700036 , "hits" : [ { "_index" : "megacorp" , "_type" : "employee" , "_id" : "1" , "_score" : 0.4700036 , "_source" : { "first_name" : "John" , "last_name" : "Smith" , "age" : 25 , "about" : "I love to go rock climbing" , "interests" : [ "sports" , "music" ] } }, { "_index" : "megacorp" , "_type" : "employee" , "_id" : "2" , "_score" : 0.4700036 , "_source" : { "first_name" : "Jane" , "last_name" : "Smith" , "age" : 32 , "about" : "I like to collect rock albums" , "interests" : [ "music" ] } } ] } }
使用查询表达式搜索
Query-string 搜索通过命令非常方便地进行临时性的即席搜索 ,但它有自身的局限性。Elasticsearch 提供一个丰富灵活的查询语言叫做 查询表达式 , 它支持构建更加复杂和健壮的查询。
1
2
3
4
5
6
7
8
GET /megacorp/employee/_search { "query" : { "match" : { "last_name" : "Smith" } } }
返回效果与之前一样
更复杂的搜索
同样搜索姓氏为 Smith 的员工,但这次我们只需要年龄大于 30 的
1
2
3
4
5
6
7
8
9
10
11
12
13
14
15
16
17
GET /megacorp/employee/_search { "query" : { "bool": { "must": { "match" : { "last_name" : "smith" } }, "filter": { "range" : { "age" : { "gt" : 30 } } } } } }
全文搜索
搜索下所有喜欢攀岩(rock climbing)的员工:
1
2
3
4
5
6
7
8
GET /megacorp/employee/_search { "query" : { "match" : { "about" : "rock climbing" } } }
返回结果
1
2
3
4
5
6
7
8
9
10
11
12
13
14
15
16
17
18
19
20
21
22
23
24
25
26
27
28
29
30
31
32
33
34
35
36
37
38
39
40
41
42
43
44
45
46
47
48
49
50
{ "took" : 13 , "timed_out" : false , "_shards" : { "total" : 1 , "successful" : 1 , "skipped" : 0 , "failed" : 0 }, "hits" : { "total" : { "value" : 2 , "relation" : "eq" }, "max_score" : 1.4167401 , "hits" : [ { "_index" : "megacorp" , "_type" : "employee" , "_id" : "1" , "_score" : 1.4167401 , "_source" : { "first_name" : "John" , "last_name" : "Smith" , "age" : 25 , "about" : "I love to go rock climbing" , "interests" : [ "sports" , "music" ] } }, { "_index" : "megacorp" , "_type" : "employee" , "_id" : "2" , "_score" : 0.4589591 , "_source" : { "first_name" : "Jane" , "last_name" : "Smith" , "age" : 32 , "about" : "I like to collect rock albums" , "interests" : [ "music" ] } } ] } }
可以看到返回结果还带有相关性得分_score
短语搜索
精确匹配 一系列单词或者短语 。 比如, 执行这样一个查询,短语 “rock climbing” 的形式紧挨着的雇员记录。
为此对 match 查询稍作调整,使用一个叫做 match_phrase 的查询
1
2
3
4
5
6
7
8
GET /megacorp/employee/_search { "query" : { "match_phrase" : { "about" : "rock climbing" } } }
高亮搜索
每个搜索结果中 高亮 部分文本片段
再次执行前面的查询,并增加一个新的 highlight 参数:
1
2
3
4
5
6
7
8
9
10
11
12
13
GET /megacorp/employee/_search { "query" : { "match_phrase" : { "about" : "rock climbing" } }, "highlight": { "fields" : { "about" : {} } } }
返回结果
1
2
3
4
5
6
7
8
9
10
11
12
13
14
15
16
17
18
19
20
21
22
23
24
25
26
27
28
{ ... "hits": [ { "_index" : "megacorp" , "_type" : "employee" , "_id" : "1" , "_score" : 1.4167401 , "_source" : { "first_name" : "John" , "last_name" : "Smith" , "age" : 25 , "about" : "I love to go rock climbing" , "interests" : [ "sports" , "music" ] }, "highlight" : { "about" : [ "I love to go <em>rock</em> <em>climbing</em>" ] } } ] } }
结果中还多了一个叫做 highlight 的部分。这个部分包含了 about 属性匹配的文本片段,并以 HTML 标签 <em> 封装
二、 Springboot整合ElasticSearch 1. 概述 SpringBoot默认支持两种技术来和ES交互;
Jest(默认不生效)
需要导入jest的工具包(io.searchbox.client.JestClient)
从springboot 2.2.0以后被弃用
SpringData ElasticSearch
版本适配说明
Spring Data Elasticsearch
Elasticsearch
3.2.x
6.8.1
3.1.x
6.2.2
3.0.x
5.5.0
2.1.x
2.4.0
2.0.x
2.2.0
1.3.x
1.5.2
Springboot 2.2.6对应于 Spring Data Elasticsearch 3.2.6,即适配Elasticsearch 6.8.1
2. 环境搭建 编写文件对应Javabean,指定索引名和类型
1
2
3
4
5
6
7
8
9
10
11
12
13
14
15
16
17
18
19
20
21
22
23
24
25
26
27
28
29
30
31
32
33
34
35
36
37
38
39
@Document (indexName = "ustc" ,type = "book" )public class Book private Integer id; private String bookName; private String author; public Integer getId () return id; } public void setId (Integer id) this .id = id; } public String getBookName () return bookName; } public void setBookName (String bookName) this .bookName = bookName; } public String getAuthor () return author; } public void setAuthor (String author) this .author = author; } @Override public String toString () return "Book{" + "id=" + id + ", bookName='" + bookName + '\'' + ", author='" + author + '\'' + '}' ; } }
3. ElasticSearch客户端
Transport Client
在ES7中已经被弃用,将在ES8被移除
High Level REST Client
ES的默认客户端
Reactive Client
非官方驱动,基于WebClient
下面以REST客户端为例说明ES的使用
配置主机地址
方式一 配置类配置
注意:这种方式底层依赖于Http相关类,因此要导入web相关jar包
1
2
3
4
5
6
7
8
9
10
11
12
@Configuration static class Config @Bean RestHighLevelClient client () { ClientConfiguration clientConfiguration = ClientConfiguration.builder() .connectedTo("localhost:9200" ) .build(); return RestClients.create(clientConfiguration).rest(); } }
方式二 spring配置文件指定
1 spring.elasticsearch.rest.uris =http://192.168.31.162:9200
在测试类中注入客户端
1
2
@Autowired RestHighLevelClient highLevelClient;
创建索引
1
2
3
4
5
6
IndexRequest request = new IndexRequest("ustc" , "book" , UUID.randomUUID().toString()) .source(Collections.singletonMap("feature" , "high-level-rest-client" )) .setRefreshPolicy(WriteRequest.RefreshPolicy.IMMEDIATE); IndexResponse index = highLevelClient.index(request, RequestOptions.DEFAULT); System.out.println(index.toString());
下面为创建索引
1
2
3
4
5
6
7
8
9
{ "_index" : "ustc" , "_type" : "book" , "_id" : "0dc9f47a-7913-481d-a36d-e8f034a6a3ac" , "_score" : 1 , "_source" : { "feature" : "high-level-rest-client" } }
得到索引
1 2 3 4 GetRequest getRequest = new GetRequest("ustc" ,"book" ,"0dc9f47a-7913-481d-a36d-e8f034a6a3ac" ); GetResponse documentFields = highLevelClient.get(getRequest, RequestOptions.DEFAULT); System.out.println(documentFields);
4. ElasticsearchRestTemplate ES有两个模板,分别为ElasticsearchRestTemplate和ElasticsearchTemplate
分别对应于High Level REST Client 和Transport Client (弃用),两个模板都实现了ElasticsearchOperations接口,因此使用时我们一般使用ElasticsearchOperations,具体实现方式由底层决定。
由于在AbstractElasticsearchConfiguration中已经向容器中导入了ElasticsearchRestTemplate,因此我们使用时可以直接注入
注入模板
1
2
@Autowired ElasticsearchOperations elasticsearchOperations;
保存索引
1
2
3
4
5
6
7
8
9
Book book = new Book(); book.setAuthor("路遥" ); book.setBookName("平凡的世界" ); book.setId(1 ); IndexQuery indexQuery = new IndexQueryBuilder() .withId(book.getId().toString()) .withObject(book) .build(); String index = elasticsearchOperations.index(indexQuery);
查询索引
1 Book book = elasticsearchOperations.queryForObject(GetQuery.getById("1" ), Book.class ) ;
5. Elasticsearch Repositories 编写相关Repository并继承Repository或ElasticsearchRepository,泛型分别为<查询类,主键>
1
2
3
public interface BookRepository extends Repository <Book ,Integer > List<Book> findByBookNameAndAuthor (String bookName, String author) ; }
查询的方法仅需按照一定规则 命名即可实现功能,无需编写实现 ,如上findByBookNameAndAuthor()方法相当于ES的json查询
1
2
3
4
5
6
7
8
9
10
{ "query" : { "bool" : { "must" : [ { "query_string" : { "query" : "?" , "fields" : [ "bookName" ] } }, { "query_string" : { "query" : "?" , "fields" : [ "author" ] } } ] } } }
更多命名规则见本文档
@Query
此外,还可以使用@Query自定义请求json
1
2
3
4
interface BookRepository extends ElasticsearchRepository <Book , String > @Query ("{\"match\": {\"name\": {\"query\": \"?0\"}}}" ) Page<Book> findByName (String name,Pageable pageable) ; }
若参数为John,相当于请求体为
1
2
3
4
5
6
7
8
9
{ "query" : { "match" : { "name" : { "query" : "John" } } } }
更多ES与springboot整合内容见官方文档
(四) Spring boot与任务 一、异步任务 在Java应用中,绝大多数情况下都是通过同步的方式来实现交互处理的;但是在处理与第三方系统交互的时候,容易造成响应迟缓的情况,之前大部分都是使用多线程来完成此类任务,springboot中可以用异步任务解决。
两个注解:
@Async 在需要异步执行的方法上标注注解
@EnableAsync 在主类上标注开启异步任务支持
开启异步任务后,当controller层调用该方法会直接返回结果,该任务异步执行
1
2
3
4
5
6
7
8
9
10
11
12
@Service public class AsyncService @Async public void sayHello () try { Thread.sleep(3000 ); System.out.println("hello async task!" ); } catch (InterruptedException e) { e.printStackTrace(); } } }
二、 定时任务 项目开发中经常需要执行一些定时任务,比如需要在每天凌晨时候,分析一次前一天的日志信息。Spring为我们提供了异步执行任务调度的方式,提供TaskExecutor 、TaskScheduler 接口。
两个注解:
@EnableScheduling 标注在主类,开启对定时任务支持
@Scheduled 标注在执行的方法上,并制定cron属性
1
2
3
4
5
6
7
@Service public class ScheduleService @Scheduled (cron = "0,1,2,3,4,5,30,50 * * * * 0-7" ) public void schedule () System.out.println("I am executing.." ); } }
cron 表达式:
second(秒), minute(分), hour(时), day of month(日), month(月), day of week(周几).
0 0/5 14,18 * * ? 每天14点整,和18点整,每隔5分钟执行一次
0 15 10 ? * 1-6 每个月的周一至周六10:15分执行一次
0 0 2 ? * 6L 每个月的最后一个周六凌晨2点执行一次
0 0 2 LW * ? 每个月的最后一个工作日凌晨2点执行一次
0 0 2-4 ? * 1#1 每个月的第一个周一凌晨2点到4点期间,每个整点都执行一次;
字段 允许值 允许的特殊字符
秒
0-59
, - * /
分
0-59
, - * /
小时
0-23
, - * /
日期
1-31
, - * ? / L W C
月份
1-12
, - * /
星期
0-7或SUN-SAT 0,7是SUN
, - * ? / L C #
特殊字符 代表含义
,
枚举
-
区间
*
任意
/
步长
?
日/星期冲突匹配
L
最后
W
工作日
C
和calendar联系后计算过的值
#
星期,4#2,第2个星期四
三、 邮件任务 springboot自动配置包中MailSenderAutoConfiguration通过@Import注解向容器中导入了MailSenderJndiConfiguration,而MailSenderJndiConfiguration向容器中导入了JavaMailSenderImpl类,我们可以使用该类发送邮件
配置文件
1
2
3
spring.mail.username =邮箱用户名 spring.mail.password =邮箱密码或授权码 spring.mail.host =smtp.example.com
自动注入
1
2
@Autowired private JavaMailSenderImpl javaMailSender;
简单邮件发送
1
2
3
4
5
6
7
8
9
SimpleMailMessage message = new SimpleMailMessage(); message.setSubject("今天开会" ); message.setText("物质楼555开会,不要迟到" ); message.setFrom("xxx@163.com" ); message.setTo("xxx@qq.com" ); javaMailSender.send(message);
复杂邮件发送
带有附件或html页面的邮件
两个设置
new MimeMessageHelper(message,true) 设置multipart=true,开启对内联元素和附件的支持
helper.setText("xxxx",true) html=ture,设置content type=text/html,默认为text/plain
1
2
3
4
5
6
7
8
9
10
11
12
13
14
15
16
MimeMessage message = javaMailSender.createMimeMessage(); MimeMessageHelper helper = new MimeMessageHelper(message,true ); helper.setSubject("今天开会" ); helper.setText("<b style='color:red'>物质楼555开会,不要迟到</b>" ,true ); helper.setFrom("hongshengmo@163.com" ); helper.setTo("1043245239@qq.com" ); helper.addAttachment("2.png" ,new File("D:\\Works\\Note\\images\\图片2.png" )); helper.addAttachment("3.png" ,new File("D:\\Works\\Note\\images\\图片3.png" )); javaMailSender.send(message);
(五) Spring boot与安全 一、安全 应用程序的两个主要区域是“认证”和“授权”(或者访问控制),这两个主要区域是安全的两个目标。 身份验证意味着确认您自己的身份 ,而授权意味着授予对系统的访问权限
认证
身份验证是关于验证您的凭据,如用户名/用户ID和密码,以验证您的身份。系统确定您是否就是您所说的使用凭据。在公共和专用网络中,系统通过登录密码验证用户身份。身份验证通常通过用户名和密码完成,
授权
另一方面,授权发生在系统成功验证您的身份后,最终会授予您访问资源(如信息,文件,数据库,资金,位置,几乎任何内容)的完全权限。简单来说,授权决定了您访问系统的能力以及达到的程度。验证成功后,系统验证您的身份后,即可授权您访问系统资源。
二、Spring Security Spring Security是针对Spring项目的安全框架,也是Spring Boot底层安全模块默认的技术选型。他可以实现强大的web安全控制。对于安全控制,我们仅需引入spring-boot-starter-security模块,进行少量的配置,即可实现强大的安全管理。
WebSecurityConfigurerAdapter:自定义Security策略
通过在配置类中继承该类重写configure(HttpSecurity http)方法来实现自定义策略
@EnableWebSecurity:开启WebSecurity模式
在配置类上标注@EnableWebSecurity开启WebSecurity模式
三、 Springboot整合security 1. 导入依赖 1 2 3 4 5 6 7 8 9 10 11 12 <dependency > <groupId > org.springframework.boot</groupId > <artifactId > spring-boot-starter-security</artifactId > </dependency > <dependency > <groupId > org.springframework.boot</groupId > <artifactId > spring-boot-starter-thymeleaf</artifactId > </dependency > <dependency > <groupId > org.springframework.boot</groupId > <artifactId > spring-boot-starter-web</artifactId > </dependency >
导入spring security的包之后,默认情况所有应用访问认证授权,默认用户名user,密码为随机生成的uuid,启动时打印在控制台
2. 登录/注销 1 2 3 4 5 6 7 8 9 10 11 12 13 14 15 16 17 18 19 20 @EnableWebSecurity public class MySecurityConfig extends WebSecurityConfigurerAdapter @Override protected void configure (HttpSecurity http) throws Exception http.authorizeRequests().antMatchers("/" ).permitAll() .antMatchers("/level1/**" ).hasRole("VIP1" ) .antMatchers("/level2/**" ).hasRole("VIP2" ) .antMatchers("/level3/**" ).hasRole("VIP3" ); http.formLogin(); http.logout(); } }
此时除了主页,点击其他的页面都会自动跳转到security自动生成的登录页面,/login来到登陆页,重定向到/login?error表示登陆失败;
http.logout()开启自动配置的注销功能,向/logout发送post请求表示注销,需要在欢迎页加上注销表单,默认注销后自动跳转到登录页面,若想改变转发路径,可以通过logoutSuccessUrl(url)设置路径
1 2 3 <form th:action ="@{/logout}" method ="post" > <input type ="submit" value ="注销" > </form >
3. 定义认证规则 为了保证密码能安全存储,springboot内置PasswordEncoder对密码进行转码,默认密码编码器为DelegatingPasswordEncoder。在定义认证规则时,我们需要使用PasswordEncoder将密码转码,由于withDefaultPasswordEncoder()并非安全已被弃用,因此仅在测试中使用。
1 2 3 4 5 6 7 8 9 10 11 12 13 14 15 16 17 18 19 20 @Bean public UserDetailsService users () User.UserBuilder builder = User.withDefaultPasswordEncoder(); UserDetails user1 = builder.username("zhangsan" ) .password("123456" ) .roles("VIP1" , "VIP2" ) .build(); UserDetails user2 = builder.username("lisi" ) .password("123456" ) .roles("VIP3" , "VIP2" ) .build(); UserDetails user3 = builder.username("wangwu" ) .password("123456" ) .roles("VIP1" , "VIP3" ) .build(); return new InMemoryUserDetailsManager(user1,user2,user3); }
4.自定义欢迎页 导入依赖
1 2 3 4 <dependency > <groupId > org.thymeleaf.extras</groupId > <artifactId > thymeleaf-extras-springsecurity5</artifactId > </dependency >
引入命名空间
1 2 3 <!DOCTYPE html > <html xmlns:th ="http://www.thymeleaf.org" xmlns:sec ="http://www.thymeleaf.org/extras/spring-security" >
根据是否登录显示游客或用户信息
1 2 3 4 5 6 7 8 9 10 11 12 13 14 <div sec:authorize ="!isAuthenticated()" > <h2 align ="center" > 游客您好,如果想查看武林秘籍 <a th:href ="@{/userlogin}" > 请登录</a > </h2 > </div > <div sec:authorize ="isAuthenticated()" > <h2 > 尊敬的<span th:text ="${#authentication.name}" > </span > ,您好!您的角色有: <span th:text ="${#authentication.authorities}" > </span > </h2 > <form th:action ="@{/logout}" method ="post" > <input type ="submit" value ="注销" > </form > </div >
根据角色类型显示信息
1 2 3 4 5 6 7 8 9 <div sec:authorize ="hasRole('VIP1')" > <h3 > 普通武功秘籍</h3 > <ul > <li > <a th:href ="@{/level1/1}" > 罗汉拳</a > </li > <li > <a th:href ="@{/level1/2}" > 武当长拳</a > </li > <li > <a th:href ="@{/level1/3}" > 全真剑法</a > </li > </ul > </div >
更多spring-security与thymeleaf整合教程
5. 自定义登录页/记住我 1 2 3 4 5 6 7 8 9 10 11 12 13 14 15 @Override protected void configure (HttpSecurity http) throws Exception ... http.formLogin() .usernameParameter("user" ) .passwordParameter("pwd" ) .loginPage("/userlogin" ); ... http.rememberMe(). rememberMeParameter("rem" ); }
通过loginPage(url)设置登录页路径后,在定制的登录页发送post url即为登录请求,并设置表单的name属性都为对应值;
通过勾选记住我,session退出后依然能通过cookie保存用户信息,下次免登陆
1 2 3 4 5 6 <form th:action ="@{/userlogin}" method ="post" > 用户名:<input name ="user" /> <br > 密码:<input name ="pwd" > <br /> <input type ="checkbox" name ="rem" > 记住我<br > <input type ="submit" value ="登陆" > </form >
更多spring-security参阅官方文档
(六) Spring boot与分布式 一、分布式应用 分布式应用(distributed application)指的是应用程序分布在不同计算机上,通过网络来共同完成一项任务的工作方式。
为什么需要分布式?
单一应用架构 垂直应用架构 分布式服务架构
流动计算架构
在分布式系统中,国内常用zookeeper+dubbo组合,而Spring Boot推荐使用全栈的Spring,Spring Boot+Spring Cloud。
二、Zookeeper和Dubbo 1. 概述 ZooKeeper
Dubbo
2. 整合springboot 环境搭建
分别创建provider和consumer模块并分别导入依赖
1 2 3 4 5 6 7 8 9 10 11 12 13 14 15 16 17 18 19 20 21 22 23 24 25 26 27 28 29 30 31 32 <dependencies > <dependency > <groupId > org.apache.dubbo</groupId > <artifactId > dubbo-spring-boot-starter</artifactId > <version > 2.7.6</version > </dependency > <dependency > <groupId > com.github.sgroschupf</groupId > <artifactId > zkclient</artifactId > <version > 0.1</version > <exclusions > <exclusion > <groupId > org.apache.zookeeper</groupId > <artifactId > zookeeper</artifactId > </exclusion > </exclusions > </dependency > <dependency > <groupId > org.apache.curator</groupId > <artifactId > curator-framework</artifactId > <version > 4.3.0</version > </dependency > <dependency > <groupId > org.apache.curator</groupId > <artifactId > curator-recipes</artifactId > <version > 4.3.0</version > </dependency > </dependencies >
provider配置文件
1 2 3 4 5 6 dubbo.application.name =provider-ticket dubbo.registry.address =zookeeper://192.168.31.162:2181 dubbo.scan.base-packages =cn.edu.ustc.service
consumer配置文件
1 2 dubbo.application.name =consumer-user dubbo.registry.address =zookeeper://192.168.31.162:2181
生产者服务
@EnableDubbo :
可以在指定的包名下(通过 scanBasePackages),或者指定的类中(通过 scanBasePackageClasses)扫描 Dubbo 的服务提供者(以 @Service 标注)以及 Dubbo 的服务消费者(以 Reference 标注)。
@Service:
表示服务的具体实现,被注解的类会被dubbo扫描
1 2 3 4 5 6 7 8 9 10 11 12 13 14 import org.apache.dubbo.config.annotation.Service;import org.apache.dubbo.config.spring.context.annotation.EnableDubbo;import org.springframework.stereotype.Component;@EnableDubbo @Component @Service public class TicketServiceImpl implements TicketService @Override public String getTicket () return "Gxx:合肥-北京" ; } }
消费者服务
编写与分布式服务类相同的接口(不必实现),并保证包结构相同
1 2 3 public interface TicketService String getTicket () ; }
@Reference 可以定义在类中的一个字段、方法上,表示一个服务的引用。通常 @Reference 定义在一个字段上
1 2 3 4 5 6 7 8 9 10 11 @Service public class UserService @Reference TicketService ticketService; public void hello () String ticket = ticketService.getTicket(); System.out.println("买到票了:" +ticket); } }
此时若调用hello(),控制台将打印
有关dubbo更多
dubbo注解详细解释
dubbo与zookeeper官方整合案例
三、Spring Cloud 1. 概述 Spring Cloud是一个分布式的整体解决方案。Spring Cloud 为开发者提供了在分布式系统(配置管理,服务发现,熔断,路由,微代理,控制总线,一次性token,全局琐,leader选举,分布式session,集群状态)中快速构建的工具,使用Spring Cloud的开发者可以快速的启动服务或构建应用、同时能够快速和云平台资源进行对接。
SpringCloud分布式开发五大常用组件
服务发现——Netflix Eureka
客服端负载均衡——Netflix Ribbon
断路器——Netflix Hystrix
服务网关——Netflix Zuul
分布式配置——Spring Cloud Config
2. 入门 Eureka注册中心
创建工程导入eureka-server模块
1 2 3 4 5 6 7 8 9 10 11 12 13 14 15 16 17 18 19 <dependencies > <dependency > <groupId > org.springframework.cloud</groupId > <artifactId > spring-cloud-starter-netflix-eureka-server</artifactId > </dependency > ... </dependencies > <dependencyManagement > <dependencies > <dependency > <groupId > org.springframework.cloud</groupId > <artifactId > spring-cloud-dependencies</artifactId > <version > ${spring-cloud.version}</version > <type > pom</type > <scope > import</scope > </dependency > </dependencies > </dependencyManagement >
配置文件
1 2 3 4 5 6 7 8 9 10 server: port: 8761 eureka: instance: hostname: eureka-server client: register-with-eureka: false fetch-registry: false service-url: defaultZone: http://localhost:8761/eureka/
生产者模块
创建工程导入eureka-client和web模块
1 2 3 4 5 6 7 8 9 10 11 12 13 14 15 16 17 18 19 20 21 22 23 <dependencies > <dependency > <groupId > org.springframework.cloud</groupId > <artifactId > spring-cloud-starter-netflix-eureka-client</artifactId > </dependency > <dependency > <groupId > org.springframework.boot</groupId > <artifactId > spring-boot-starter-web</artifactId > </dependency > ... </dependencies > <dependencyManagement > <dependencies > <dependency > <groupId > org.springframework.cloud</groupId > <artifactId > spring-cloud-dependencies</artifactId > <version > ${spring-cloud.version}</version > <type > pom</type > <scope > import</scope > </dependency > </dependencies > </dependencyManagement >
配置文件
1 2 3 4 5 6 7 8 9 10 11 12 13 server: port: 8002 spring: application: name: provider-ticket eureka: instance: prefer-ip-address: true # 注册服务的时候使用服务的ip地址 client: service-url: defaultZone: http://localhost:8761/eureka/
编写controller层和service层demo
1 2 3 4 5 6 7 8 9 10 11 12 13 14 15 16 17 18 @Service public class TicketService public String getTicket () System.out.println("8002" ); return "《厉害了,我的国》" ; } } @RestController public class TicketController @Autowired TicketService ticketService; @GetMapping ("/ticket" ) public String getTicket () return ticketService.getTicket(); } }
消费者模块
创建工程导入eureka-client和web模块
配置文件
1 2 3 4 5 6 7 8 9 10 11 12 spring: application: name: consumer-user server: port: 8200 eureka: instance: prefer-ip-address: true client: service-url: defaultZone: http://localhost:8761/eureka/
向容器中注入RestTemplate, 并使用@EnableDiscoveryClient开启发现服务功能
1 2 3 4 5 6 7 8 9 10 11 12 13 14 @EnableDiscoveryClient @SpringBootApplication public class ConsumerUserApplication public static void main (String[] args) SpringApplication.run(ConsumerUserApplication.class , args ) ; } @LoadBalanced @Bean public RestTemplate restTemplate () return new RestTemplate(); } }
编写controller并使用RestTemplate发现服务
1 2 3 4 5 6 7 8 9 10 11 12 @RestController public class UserController @Autowired RestTemplate restTemplate; @GetMapping ("/buy" ) public String buyTicket (String name) String s = restTemplate.getForObject("http://PROVIDER-TICKET/ticket" , String.class ) ; return name+"购买了" +s; } }
向http://localhost:8200/buy?username=zhangsan发请求,则会响应
并且在使用了@LoadBalanced之后实现了负载均衡,如果创建不同端口的provider应用,则访问会被均衡到各个应用
(七) Spring boot与热部署 在开发中我们修改一个Java文件后想看到效果不得不重启应用,这导致大量时间花费,我们希望不重启应用的情况下,程序可以自动部署(热部署)。有以下四种情况,如何能实现热部署。
一、模板引擎 在Spring Boot中开发情况下禁用模板引擎的cache
二、Spring Loaded Spring官方提供的热部署程序,实现修改类文件的热部署
三、JRebel 收费的一个热部署软件
引入依赖
1 2 3 4 <dependency > <groupId > org.springframework.boot</groupId > <artifactId > spring-boot-devtools</artifactId > </dependency >
IDEA使用ctrl+F9重新编译实现热部署
(八) Spring Boot与监控管理 通过引入spring-boot-starter-actuator,可以使用Spring Boot为我们提供的准生产环境下的应用监控和管理功能。我们可以通过HTTP,JMX,SSH协议来进行操作,自动得到审计、健康及指标信息等
一、 Actuator监控管理 导入依赖
1 2 3 4 <dependency > <groupId > org.springframework.boot</groupId > <artifactId > spring-boot-starter-actuator</artifactId > </dependency >
浏览器打开链接http://localhost:8080/actuator/,可以看到所有支持的连接,响应如下,默认只支持这些端点
1 2 3 4 5 6 7 8 9 10 11 12 13 14 15 16 17 18 19 20 { "_links" : { "self" : { "href" : "http://localhost:8080/actuator" , "templated" : false }, "health" : { "href" : "http://localhost:8080/actuator/health" , "templated" : false }, "health-path" : { "href" : "http://localhost:8080/actuator/health/{*path}" , "templated" : true }, "info" : { "href" : "http://localhost:8080/actuator/info" , "templated" : false } } }
如果要看到所有支持的状态查询,需要配置
1 management.endpoints.web.exposure.include =*
bean加载情况http://localhost:8080/actuator/beans,显示了容器中各类各项属性
1 2 3 4 5 6 7 8 9 10 11 12 13 14 15 16 17 18 19 20 21 22 { "contexts" : { "application" : { "beans" : { "endpointCachingOperationInvokerAdvisor" : { "aliases" : [], "scope" : "singleton" , "type" : "org.springframework.boot.actuate.endpoint.invoker.cache.CachingOperationInvokerAdvisor" , "resource" : "class path resource [org/springframework/boot/actuate/autoconfigure/endpoint/EndpointAutoConfiguration.class]" , "dependencies" : [ "environment" ] }, "defaultServletHandlerMapping" : { "aliases" : [], "scope" : "singleton" , "type" : "org.springframework.web.servlet.HandlerMapping" , "resource" : "class path resource [org/springframework/boot/autoconfigure/web/servlet/WebMvcAutoConfiguration$EnableWebMvcConfiguration.class]" , "dependencies" : [] }, } ...
二、 端点配置 默认情况下,除shutdown以外的所有端点均已启用。要配置单个端点的启用,请使用management.endpoint.<id>.enabled属性。以下示例启用shutdown端点:
1 management.endpoint.shutdown.enabled =true
另外可以通过management.endpoints.enabled-by-default来修改全局端口默认配置,以下示例启用info端点并禁用所有其他端点:
1 2 management.endpoints.enabled-by-default =false management.endpoint.info.enabled =true
修改路径
1 2 3 4 management.endpoints.web.base-path =/management management.endpoints.web.path-mapping.health =healthcheck
更多参阅spring-actuator官方文档